Battery switch on travel trailer function is crucial for managing your RV’s power. Understanding how these switches work – whether single-pole, double-pole, or double-pole double-throw – is key to safe and efficient power usage. This guide will walk you through the different types, their placement, safe operation, troubleshooting tips, and maintenance best practices. We’ll also cover integrating them with solar panels and inverters, plus upgrading or replacing your switch if needed.
Properly managing your travel trailer’s power starts with understanding your battery switch. This involves knowing its location, how to safely operate it, and what to do if problems arise. This guide will equip you with the knowledge to confidently handle all aspects of your RV’s electrical system, ensuring safe and reliable power whenever you hit the road.
Battery Switch Types in Travel Trailers: Battery Switch On Travel Trailer Function
Choosing the right battery switch for your travel trailer is crucial for managing your power sources effectively and preventing electrical issues. Different types of switches offer varying levels of control and protection. Understanding their capabilities will help you select the best option for your needs.
Single-Pole Battery Switches
Single-pole switches are the simplest type. They control the power flow from a single battery to the trailer’s electrical system. This means you can only connect one battery at a time to your trailer’s circuits. They are inexpensive and easy to install, but their limited functionality makes them unsuitable for trailers with multiple batteries or those needing battery isolation for charging.
Double-Pole Battery Switches
Double-pole switches provide more control than single-pole switches. They can manage two batteries independently, allowing you to switch between them or connect both to the trailer’s system simultaneously. This offers greater flexibility for managing power and extending your run time. However, they still lack the isolation capabilities of more advanced switches.
Double-Pole Double-Throw (DPDT) Battery Switches
DPDT switches offer the most comprehensive control. They allow you to connect either battery to the trailer’s electrical system individually, connect both batteries in parallel, or completely disconnect both batteries from the system. This is particularly useful for charging batteries independently, preventing reverse current flow, and protecting your electrical system. While more expensive than single-pole or double-pole switches, the added safety and control make them a worthwhile investment for many RVers.
Comparison of Battery Switch Types
The table below summarizes the key differences between the three types of battery switches:
| Switch Type | Number of Batteries Controlled | Isolation Capability | Cost |
|---|---|---|---|
| Single-Pole | One | None | Low |
| Double-Pole | Two | Limited | Medium |
| Double-Pole Double-Throw (DPDT) | Two | Full (can isolate both batteries) | High |
Operating the Battery Switch

Properly operating your travel trailer’s battery switch is crucial for maintaining your power systems and ensuring your safety. This process is relatively straightforward, but understanding the correct procedure and associated safety measures is essential to prevent accidents and damage. This section details the steps involved and highlights important safety precautions.
Before you begin any work with your travel trailer’s electrical system, always remember to disconnect the negative (-) terminal of your battery first. This helps prevent accidental short circuits and protects you from electrical shocks. Once you’ve completed your work, reconnect the negative terminal last.
Safe Battery Switch Operation Procedure
The following steps Artikel the safe and efficient operation of your travel trailer’s battery switch. These steps are general guidelines; always consult your specific travel trailer’s owner’s manual for detailed instructions relevant to your model.
- Locate the Battery Switch: Your battery switch is typically located near the batteries themselves, often in a compartment easily accessible from the outside of your travel trailer. It might be a simple on/off switch or a more complex multi-position switch.
- Inspect the Switch and Connections: Before operating the switch, visually inspect it for any signs of damage, corrosion, or loose connections. Tighten any loose connections and address any corrosion you find before proceeding.
- Turn the Switch to the “Off” Position (if applicable): If your switch has an “off” position, ensure it’s in this position before beginning any other work on the electrical system. This completely isolates the battery from the trailer’s electrical system.
- Turn the Switch to the “On” Position: To activate the power to your travel trailer’s systems, carefully turn the switch to the “on” position. You should hear a click or feel a distinct change in the switch’s position.
- Verify Power: After turning the switch on, check that your appliances and lights are functioning correctly. If not, double-check the switch position and all connections.
- Turn the Switch to the “Off” Position (when finished): When you are finished using your travel trailer, remember to switch the power off to conserve battery life and prevent accidental drain. This is particularly important if you will be storing your trailer for an extended period.
Safety Precautions When Working with Batteries and Electrical Systems
Working with batteries and electrical systems involves inherent risks. Following these precautions is critical to prevent injury or damage.
- Always wear safety glasses to protect your eyes from sparks or battery acid splashes.
- Use insulated tools to prevent electrical shocks. Never use metal tools when working with electrical connections.
- Ensure adequate ventilation when working with batteries, as they release hydrogen gas, which is flammable and explosive.
- Never allow children or untrained individuals to work near batteries or electrical systems.
- Have a fire extinguisher readily available in case of an electrical fire.
- If you are unsure about any aspect of the process, consult a qualified electrician or RV technician.
Potential Hazards of Improper Battery Switch Operation
Improper operation of your travel trailer’s battery switch can lead to several problems. Understanding these potential hazards helps you avoid them.
- Electrical Shock: Incorrect handling of the switch or working on live electrical systems can result in a dangerous electrical shock.
- Battery Damage: Improper use of the switch could lead to overcharging or excessive discharging, damaging the battery and reducing its lifespan.
- System Malfunction: A faulty switch or incorrect operation can cause malfunctions in your travel trailer’s electrical systems, leading to the failure of appliances or lighting.
- Fire Hazard: Sparks from loose connections or a short circuit can ignite flammable materials near the battery or electrical system, potentially causing a fire.
- Corrosion: Neglecting to address corrosion on the battery terminals or switch can lead to poor connections, reducing performance and potentially causing overheating.
Troubleshooting Common Battery Switch Issues
Dealing with a faulty battery switch in your travel trailer can be frustrating, but with a systematic approach, you can usually pinpoint and fix the problem. This section Artikels common issues and provides troubleshooting steps to get you back on the road. Remember safety first – always disconnect the battery before working on any electrical components.
No Power to the Trailer
This is the most common problem. Before you start tearing things apart, check the obvious first. A lack of power could stem from several sources, not necessarily the battery switch itself.
- Check the main battery switch: Ensure the switch is in the “on” position. Sometimes, a simple oversight is the culprit.
- Inspect the battery connections: Look for corrosion, loose connections, or broken wires at both the battery terminals and where the cables connect to the switch. Clean any corrosion with a wire brush and baking soda and water solution. Tighten loose connections.
- Test the battery: Use a multimeter to check the battery voltage. A reading below 12 volts indicates a weak or dead battery requiring replacement or charging.
- Check the fuses: Look for blown fuses in the battery disconnect switch itself, as well as the main fuse box in your trailer. Replace any blown fuses with fuses of the correct amperage.
- Verify the wiring: Carefully inspect the wiring running from the battery to the switch and from the switch to the trailer’s electrical system. Look for any breaks, damage, or loose connections. If you find any issues, repair or replace the affected wiring.
Blown Fuses
Repeatedly blown fuses indicate a short circuit somewhere in your trailer’s electrical system. Finding and fixing the short is crucial to prevent further damage.
- Identify the circuit: Determine which circuit the blown fuse protects. This information is usually printed on the fuse box cover.
- Check appliances on that circuit: Inspect all appliances and devices connected to the affected circuit for any signs of damage or shorts. Look for frayed wires, exposed terminals, or water damage.
- Systematic testing: If you can’t visually identify the short, you might need to systematically disconnect appliances one by one to isolate the faulty component. Replace the fuse after each disconnection to see if it blows again. If it continues to blow, there might be a problem in the wiring itself.
- Professional help: If you are unable to locate the short circuit, it’s best to seek the assistance of a qualified RV technician.
Corroded Connections
Corrosion is a common enemy of electrical systems. It creates resistance, leading to reduced power or complete failure.
- Clean the connections: Use a wire brush and a baking soda and water paste to clean all battery terminals and connections at the switch. Make sure to remove all corrosion thoroughly.
- Apply dielectric grease: After cleaning, apply a dielectric grease to the cleaned connections to prevent future corrosion. This helps repel moisture and keeps the connections clean.
- Tighten connections: Ensure all connections are securely tightened. Loose connections can lead to increased resistance and heat buildup, exacerbating corrosion.
Battery Switch Maintenance and Upkeep
Regular maintenance of your travel trailer’s battery switch is crucial for ensuring reliable power and preventing costly repairs. Neglecting this simple task can lead to corrosion, poor connections, and ultimately, a dead battery when you need it most. A proactive approach will keep your system running smoothly for years to come.Proper maintenance involves a few key steps performed on a regular schedule.
These steps will help you identify potential problems before they become major issues, saving you time, money, and frustration on the road.
Regular Maintenance Schedule
A good rule of thumb is to inspect your battery switch and connections every three months, or before and after each extended trip. More frequent checks might be necessary in harsh environments with high humidity or extreme temperatures. This schedule ensures early detection of any corrosion or damage. During these inspections, you’ll perform the cleaning and visual checks detailed below.
Consider adding a more thorough inspection, including testing the switch’s functionality, annually.
Cleaning Battery Terminals and Connections
Dirty battery terminals are a common cause of poor connections and reduced power. Corrosion buildup creates resistance, preventing the efficient flow of electricity. To clean them, you’ll need a wire brush (preferably a brass one to avoid scratching the terminals), baking soda, and water. First, disconnect the battery cables from the terminals. Then, use the wire brush to remove any corrosion from both the terminals and the cable ends.
Next, make a paste of baking soda and water and apply it to the terminals, letting it sit for a few minutes to neutralize any acid. Finally, scrub the terminals again with the brush, rinse them with water, and reconnect the cables, ensuring a tight connection. You should notice a significant improvement in your battery’s performance.
Inspecting the Switch for Wear and Tear, Battery switch on travel trailer function
Visually inspecting the battery switch itself is just as important as cleaning the terminals. Look for any signs of damage, such as cracks in the plastic housing, loose screws, or corrosion around the switch mechanism. Pay close attention to the switch lever itself; a loose or wobbly lever may indicate internal damage. If you notice any significant wear or damage, it’s best to replace the switch immediately to prevent potential electrical problems.
A damaged switch could lead to intermittent power or even a complete power failure.
Integrating Battery Switches with Solar Panels and Inverters
Adding solar panels and an inverter to your travel trailer significantly enhances its off-grid capabilities, but understanding how these components interact with your battery switch is crucial for efficient power management. The battery switch acts as a central control point, allowing you to isolate and manage power flow from different sources to your trailer’s electrical system.The battery switch’s primary role is to disconnect or connect your house batteries to the trailer’s electrical system.
This is important for safety and to prevent unwanted battery drain. When solar panels are involved, the switch helps direct the power generated by the panels, either directly to the batteries for charging or to the house system. Similarly, it manages the power flow from the inverter, which converts DC battery power to AC power for running appliances.
So, you’re planning a trip? Awesome! Don’t forget travel insurance! Check out aon travel insurance for comprehensive coverage. They’ve got you covered for pretty much anything that could go wrong. And if you’re looking for something a little more specialized, consider comparing that to aon travel insurance options; they might have packages tailored to adventure travelers.
Either way, securing your trip with solid insurance is a smart move.
Power Flow Management with Battery Switch
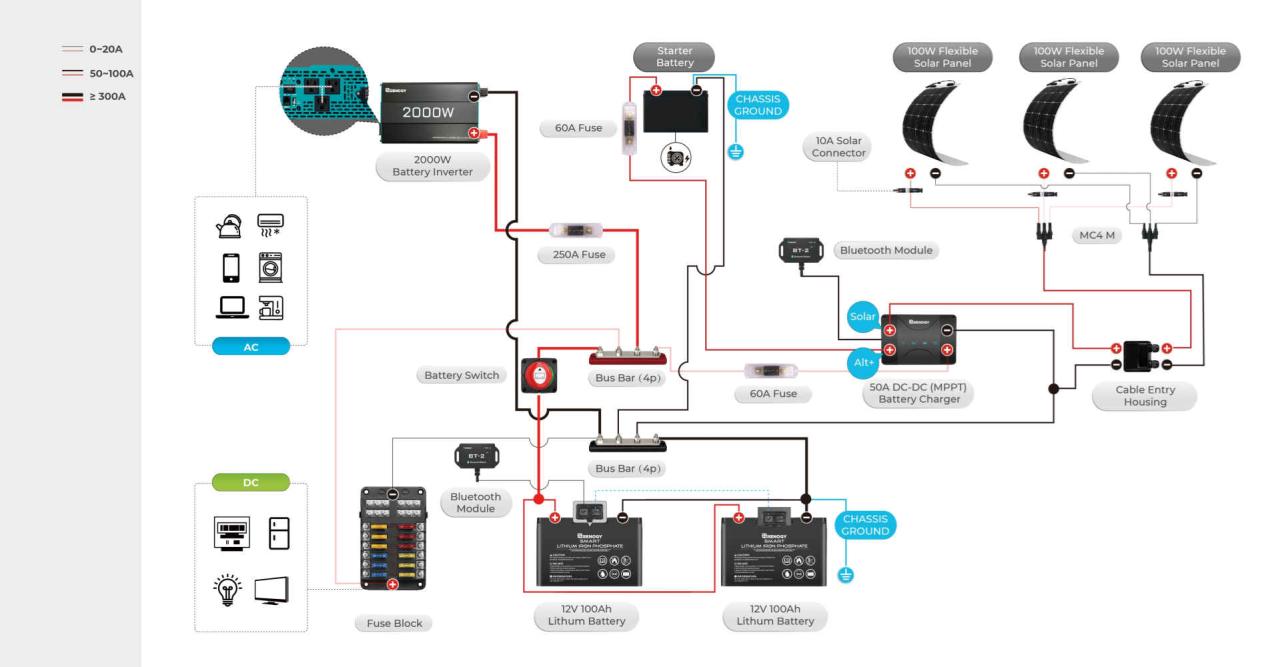
Let’s imagine a typical setup. Your solar panels are connected to a solar charge controller, which regulates the charging current going to your house batteries. The batteries are then connected to your battery switch. This switch, in turn, connects to the trailer’s 12V DC system and also to the inverter. The inverter converts the 12V DC from the batteries (when the switch is on) to 120V AC power for your appliances.
The battery switch acts as the gatekeeper, determining whether power from the batteries (and by extension, the solar panels charging them) flows to the house system and the inverter. If the switch is off, the house system and inverter are isolated from the batteries, preventing drain.
So, you’re planning a trip? Awesome! Before you jet off, remember travel insurance is key. Check out aon travel insurance for comprehensive coverage. They’ve got you covered for medical emergencies, lost luggage, and more. Speaking of peace of mind, another great option to explore is aon travel insurance , which often offers specialized packages depending on your destination and travel style.
Do your research and choose the plan that best suits your needs!
Diagram of Power Flow
Imagine a simple diagram:
1. Solar Panels
Sunlight hits the solar panels, generating DC electricity.
2. Solar Charge Controller
The DC electricity flows to the solar charge controller, which regulates the voltage and current to safely charge the batteries.
3. House Batteries
The regulated DC electricity charges the house batteries.
4. Battery Switch
The battery switch acts as a disconnect, controlling whether the batteries are connected to the rest of the system.
5. Inverter
If the battery switch is on, the batteries supply DC power to the inverter, which converts it to 120V AC power.
6. AC Loads (Appliances)
The 120V AC power from the inverter powers your appliances (lights, refrigerator, etc.).
12V DC Loads (Lights, Fans): If the battery switch is on, 12V DC power from the batteries directly powers your 12V DC loads.
The battery switch is essential because it allows you to completely isolate your house batteries from the rest of the system when not in use. This prevents accidental drain and extends the lifespan of your batteries. You can also use the switch to selectively power different parts of your system. For example, you could turn off the AC system (via the inverter) while keeping the 12V DC lights on.
Upgrading or Replacing a Battery Switch
Upgrading or replacing your travel trailer’s battery switch is a straightforward process that can significantly improve your RV’s electrical system. Whether you need a higher amperage rating to accommodate new appliances or simply want a more robust and reliable switch, understanding the process and available options is key. This section will guide you through the steps involved, helping you choose the right replacement and ensuring a safe and successful installation.Replacing a battery switch is generally a relatively simple task, but it does involve working with your RV’s electrical system, so safety precautions are essential.
Always disconnect the battery’s negative terminal before starting any work.
Battery Switch Selection
Choosing the right replacement battery switch depends on your specific needs. Consider the total amperage draw of all your appliances and charging systems. You’ll need a switch with an amperage rating that comfortably exceeds this total. For example, if your total draw is 100 amps, a 150-amp switch would provide a safety margin. Features to consider include the type of switch (single or dual battery), the presence of a disconnect switch, and the overall build quality.
Some brands known for quality and reliability include Blue Sea Systems, Perko, and Guest. Higher-end models often include features like backlit indicators or integrated circuit breakers for added safety. Lower-cost options are available, but might lack these features and may not be as durable in the long run.
Tools and Materials Needed
Before you begin, gather the necessary tools and materials. This will ensure a smooth and efficient replacement.
- New battery switch (with appropriate amperage rating)
- Wire strippers/cutters
- Crimping tool (for wire connectors)
- Screwdrivers (Phillips and flathead)
- Wrench (size appropriate for your battery terminals)
- Wire connectors (butt connectors or ring terminals)
- Electrical tape
- Heat shrink tubing (optional, but recommended for a professional finish)
- Multimeter (for testing circuits, optional but helpful)
Replacement Process
The steps for replacing your battery switch will vary slightly depending on the specific model of your travel trailer and the type of switch installed. However, the general process remains consistent. Remember, safety is paramount; always disconnect the negative battery terminal before starting.
- Disconnect the negative battery cable.
- Carefully remove the old battery switch. Take photos or make notes of the wiring connections before disconnecting anything to aid in reassembly.
- Install the new battery switch in the same location as the old one, securing it with the appropriate fasteners.
- Reconnect the wires to the new switch, ensuring that each wire is connected to the correct terminal. Use wire connectors to ensure secure and corrosion-resistant connections.
- Apply electrical tape or heat shrink tubing to all connections for added protection.
- Reconnect the negative battery cable.
- Test the new switch to ensure it’s functioning correctly.
Mastering your travel trailer’s battery switch is about more than just flipping a switch; it’s about understanding your RV’s power system and ensuring safe and efficient operation. From selecting the right type of switch to performing regular maintenance, this guide provides the essential knowledge for trouble-free power management on all your adventures. Remember, safety first – always disconnect power before working on any electrical components.
Happy travels!
Frequently Asked Questions
What size battery switch do I need?
The appropriate amperage rating depends on your battery bank’s capacity. Consult your battery’s specifications and choose a switch with a higher amperage rating than your system’s maximum draw.
Can I use a battery switch with a generator?
Yes, but ensure the generator’s output is compatible with your battery system and the switch’s amperage rating. Always follow the manufacturer’s instructions for both the generator and the battery switch.
My battery switch is making a clicking sound. What’s wrong?
This could indicate a loose connection, a faulty switch, or a problem with the wiring. Inspect the connections for corrosion or damage. If the problem persists, consult a qualified electrician.
How often should I clean my battery terminals?
Clean your battery terminals at least twice a year, or more frequently if you notice corrosion or performance issues. Use a wire brush and baking soda solution to remove corrosion.
